Guaranteed To Last 10+ Years
Sharpie-Proof Finish
Self Install or Hire Us!
Whiteboard Resurfacing / Chalkboard Resurfacing
Whiteboard Resurfacing
Chalkboard Resurfacing
Refinish Your Whiteboard Paint
HIGHEST QUALITY
WHITEBOARD FILM
REPURPOSE EXISTING
INFRASTRUCTURE
WORKS WITH EVERY
DRY ERASE MARKER
Want A Quick Estimate?
Whiteboard Resurfacing
Chalkboard Resurfacing
Refinish Your Whiteboard Paint
Guaranteed To Last 10+ Years
Sharpie-Proof Finish
Self Install or Hire Us!
HIGHEST QUALITY
WHITEBOARD FILM
REPURPOSE EXISTING
INFRASTRUCTURE
WORKS WITH EVERY
DRY ERASE MARKER
Want A Quick Estimate?
Want A Quick Estimate?
Why Resurface Your Whiteboards?
- Convert your old boards in under 15 minutes a piece
- Keep your old and sturdy infrastructure with our high quality finish
- Save on an asbestos abatement if your classrooms might have asbestos
- Save your old boards from going into the landfill
- Keep your technology healthy by removing chalk dust from the air
- Save your facilities team time and energy. Super easy cleaning.
Why Resurface With Think Board?
- Scratch-Resistant & Sharpie-Proof Finish
- Quick, Easy, and Bubble Free Installation, guaranteed
- Free Replacements for 10 Years if you have any issues
- Think Board works with all dry erase markers and will always be clean
- Permanent markers erase cleanly with rubbing alcohol
- No expo spray cleaner needed. Just water and a cloth!
- Our Whiteboard Resurfacing Sheets are easier to install than alternatives
- We also offer a Magnetic Think Board that converts non-magnetic boards into premium quality magnetic whiteboards
Why Resurface Your Boards
Think Board Review
Want To Hear How We Can Help Your School?
Connect with us before July 31st!
And we'll include the install kit for free! ($85 value)
Case Studies: Hear How We Helped Other Districts!
Pricing & Warranty Information
Sold out
Perfect for:
- Turning your whiteboard or chalkboard into a magnetic whiteboard for your classroom or home/dorm room walls
- Transforming your old, stained whiteboard into a fresh, magnetic dry-erase surface
- Reviving your spaces while promoting creative thinking and organized planning
- Avoiding the hassle of drilling new whiteboards over the top of old chalkboards
- Bypassing the need for whiteboard paint that may fail within 6 months
Why You Should Upgrade
How To Resurface
What Can Think Board Do?
Pretty Much Anything Dry Erase!
Restore Your Old Whiteboards
Save money, hassle, and cleaning time for your staff.
And Make Them Brand New Again.
10-Year Lifespan. No chemicals needed for cleaning. Ultra durable.
Don't Settle For Cheaper Dry Erase Films
They crack and bubble over time. We've seen this too much to count.
10+ Years Guaranteed. You Won't Regret It
If you do, we'll replace or refund you. You're in good hands.
Custom Staff For The Music Room?
We can do it all. Custom charts, grids, dot patterns, logos. You name it.
Or Gridlines For Math Class?
Don't throw away a sliding system... Resurface with Think Board!
Whiteboard Paint Resurfacing
Trust us... We've resurfaced hundreds of walls like this.
Go Floor-To-Ceiling With Think Board Instead!
With a small seam, a wall-to-wall whiteboard is easy!
Or Grab A Classroom Set!
In under 20 minutes you could convert your entire classroom.
Create A New Way To Engage Students
Just peel & stick. Precut to size.
Whiteboard Tables In The Classroom
There when you need it. Invisible when you don't.
Or Cover The Table In The Back With White
Resurface old tables that otherwise might go to the landfill.
We Can Custom Cut To Fit Your Desks
In premium clear or premium white.
Or Custom Size For The Library Tables
Why not give the students more places to collaborate?
Looking for 1 or 2 to start? Grab some today!
Frequently Asked Questions
Is there anything I definitely need to know?
-
Glad you asked :)
1. Watch our install video. You’ll be happy you did. - 2. Get a group of 2-3 people to help with the install.
- 3. Clean your chalkboard, whiteboard, or tables as best as you can. Remove table glue, adhesive, or anything else that feels bumpy to the touch.
- 4. Wet install the product (as seen in the video). Use more water than you'd think. The water will be squeegeed out and will evaporate.
- 5. Sharpie can be removed with 70% Rubbing Alcohol.
- 6. You can deep clean your Think Boards with 70% Rubbing Alcohol as often as you'd like. It won't damage the board.
- 7. Think Board is thin enough that the original board will retain its magnetic receptivity if it was already magnetic. So if you have an old magnetic chalkboard, you're about to have a fancy new magnetic whiteboard!
- 8. Free US shipping & free returns. Try it & love it. And if not, you have 100 days to return it, no questions asked :)
Click To Expand the rest of the FAQ
What are real teachers saying?
Chalkboard Resurfacing Review
Ms Brown asked us to come change her chalkboards into whiteboards with our Premium Think Board film. And we did! Here is her initial reaction halfway through the install :)
What do you need from me for a quote?
If you want us to install:
All we need is a PDF / Excel sheet with the room numbers, sizes, and locations of each board. Please include a photo or two of the classrooms so we can get an idea of what is needed for the install. For the size measurements, please round up to the nearest foot. For example, most 4'x8' boards actually measure 47"x95". For this, just call it a 4'x8'. For installs, normally we cut on-site in case of any measurement errors or changes to the order.
Please send this info to orders@think-board.com or fill out this form here we'll get back to you asap!
If you plan to install:
Please send the quantities of each size you need, rounded up to the nearest foot. For example, most 4'x8' boards actually measure 47"x95". For this, just call it a 4'x8' and we'll end up sending a 4'x8.25' board for wiggle room.
Please send this info to orders@think-board.com or fill out this form here we'll get back to you asap!
How can I get a sample?
Grab yourself a free sample here! Included in this folder is an 8.5"x11" Think Board, our Pricing Guide, 10-Year Warranty info, and 4 case studies covering various projects we've done. If you would like a bigger sample, please give us a call at 617-657-9616 ext. 1
How do I keep my Think Boards squeaky clean?
We include a microfiber cloth with every Think Board. You won’t need any whiteboard cleaner or chemicals to clean your board, ever. If you leave markings on the board for over 2 weeks, a mist of water will help it return to 100%
If for some reason something is not erasing, it is likely that there could be some goop or glue or something weird stuck to the Think Board. Rubbing alcohol should take that right off. And if colors aren’t cleaning properly, rubbing alcohol will handle that too!
To deep clean your Think Board (monthly or annually), we recommend using 70% isopropyl alcohol. This will bring your Think Board back to looking brand new in no time! Isopropyl Alcohol is a great cleaner for Think Boards, but be careful not to use it on other whiteboards. Our film is specifically designed to clean with rubbing alcohol - other boards are not. Harsh cleaners like this will cause the surface of other whiteboards to break down the whiteboard coating.
ps. Often times we end up resurfacing boards for schools that were cleaning their boards with a glass cleaner, rubbing alcohol, ethanol, or other harsh cleaners. As you're probably aware by now, we can resurface those boards for you! Learn more about resurfacing here.
What if someone uses permanent marker? Or a student swaps out the teachers marker to be "funny" 😳
Stress no more! Permanent marker comes off with just a few drops of 70% Isopropyl Alcohol. Gone are the days of cursing in your head about someone using the wrong marker... This is one of the top reasons schools upgrade their whiteboards to Think Board. It saves SO much time and hassle for daily cleaning and deep cleaning.
The testing we've done on our Resurfacing Think Boards
- - We left dry-erase marker on a Premium Think Board for 6 months and it erased with nothing but a microfiber cloth.
- - We successfully erased a small sharpie marking off a Premium Think Board 3 years after it was marked.
- - After every demo board we install (for a school), we draw on it with Sharpie to prove that it actually erases.
Long story short, we need another 5-10 years to run these next tests to see if it will erase after a longer period of time!
Below is a quick GIF of us erasing week-old Sharpie from our new "Think Notes," which are also made with our Premium Material. If that's not enough to convince you, grab a sample and test for yourself!
Are Think Boards Magnetic?
We have both Magnetic and Non-Magnetic options. Our normal Resurfacing Think Boards are not magnetic, but if you are installing the Think Board over a magnetic surface (like an old magnetic chalkboard) the board will still be magnetic!
Pro Tip: We often see layers of boards on top of the original chalkboards. If you have Showerboard or Melamine boards mounted on top of old chalkboards, there's a chance your original chalkboards are magnetic. We'd recommend removing these layers and resurfacing the chalkboard for the best performance and aesthetic!
Before
After
If your boards are not magnetic but you would like them to be, you can check out our Magnetic Think Boards here.
My boards are already Magnetic. Will it still be Magnetic?
Yes! Our normal Resurfacing Think Boards are not magnetic, but if you are installing the Think Board over a magnetic surface (like an old magnetic chalkboard) the board will still be magnetic!
Important Tip: We've seen a few other whiteboard films out there. We're biased, but we firmly believe that none of them are as good as Think Board. Some of these films are thicker than the Think Board, which negatively impacts the Magnetic Receptivity of the board. Don't believe us? Check out this video we took at a school we were at recently.
Premium Think Boards vs. Resurfacing vs. Regular. What's the difference?
Our Premium Think Boards, Premium XL Think Boards, Resurfacing Think Boards, Magnetic Think Boards, Premium XL Calendars, and Whiteboard Table Covers are all made with our Premium Think Board Material. Most of these products come in Clear and White.
Our normal Think Board products are excellent for moderate use. If you just want a place to jot down ideas here and there, the Think Board Medium or Think Board Large is for you! These products all come in Clear and White.
The Premium Think Boards erase better, stay clean longer, stick better, remove better, and are easier to install. They work with every dry-erase marker, have a sharpie-proof coating, scratch-resistant finish, and last 10-15 years in high-use settings (classrooms, hospitals, coworking spaces). They only need our included microfiber cloth for cleaning, but can also be deep cleaned with 70% Rubbing Alcohol if needed. (If you get a sharpie or anything else permanent on the board, you will probably need Rubbing Alcohol to remove it).
If you plan to use your Think Board every day, multiple times per day, or if you plan to have your Think Board in a public-facing part of the office, school, hospital, etc, we'd recommend a Premium Think Board.
The testing we've done on our Premium Think Boards
- - We left dry-erase marker on a Premium Think Board for 6 months and it erased with nothing but a microfiber cloth.
- - We successfully erased a small sharpie marking off a Premium Think Board 3 years after it was marked.
- - After every demo board we install (for a school), we draw on it with Sharpie to prove that it actually erases.
Long story short, we need another 5-10 years to run these next tests to see if it will erase after a longer period of time!
Below is a quick GIF of us erasing week-old Sharpie from our new "Think Notes," which are also made with our Premium Material. If that's not enough to convince you, grab a sample and test for yourself!
How is Think Board better than Whiteboard Paint?
As you can see, this is an image of a Think Board on top of "old" whiteboard paint. The paint was painted about 2 years ago, but is long overdue for a fresh coating. While this Think Board has only been on the wall for 6 months (at the time of this photo), it's clear that the Think Board erases much cleaner.
If you have regular paint, and you're thinking about whiteboard paint... consider the cost of paint + cost of a professional install + 7 days of waiting time before you can use the wall + the harmful VOCs that are offgasing from the paint. Also, when you want to remove the paint, you'll need to sand the wall down and repaint to get the wall back to normal. Not ideal...
Sadly, about 85% of the people we talk to were unable to install their paint properly... and therefore, it looks like this (see image).
If you have old dry erase paint, our Premium Think Boards will stick right onto the paint. We recommend heavilty scrubbing the walls prior to install, because this image is not how you want your office to look.
We'd be happy to send you a case study we did on Think Board vs Whiteboard Paint or put you in touch with schools who have experience with both Think Board and Whiteboard paint.
What states/countries do you service?
We have install crews in pretty much every major city in the United States & Canada. As long as you are within a few hour's drive from a big city, we'll be there!
We also have an install team in the UK who is happy to service most of Europe if needed.
Outside of this region? Let us know and we'll happily look into expanding into your region so we can work with you and the schools, offices, and hospitals in your area.
Are you on any purchasing contracts?
We are not on any Purchasing Contracts at the moment (although we are actively working on this). So if this is necessary for you, please reach out and maybe we'll have an update!
We do manufacture this product and therefore are the only company in the world that have access to this specific material. We have a Sole Source letter we can email over to you that clearly spells out all the information needed to ensure that your purchase is approved.
Do you accept Purchase Orders?
Yes, we do! We accept Purchase Orders with terms from Schools and Hospitals. If you are not a School or Hospital, we can still process a PO, but will need payment via ACH or Credit Card before we ship your products.
If you would like to order via a Purchase Order, please email purchasing@think-board.com for a formal estimate and our W9.
We are tax exempt. Can you honor that?
Yes, we can! Just send over your Tax Exemption Certificate to hello@think-board.com
If you're ordering via PO, the process is simple. If you would like to order Tax Exempt online, please create an account on our site here, email your Tax Exemption Certificate to us, and request that we update your account to Tax Exempt.
Do you have a Sole Source letter?
We manufacture this product and are the only company in the world with access to this material. We have a Sole Source letter we can email over to you that clearly spells out all the information needed to ensure that your purchase is approved.
Just email hello@think-board.com and we'll get it over to you!
Does this save the hassle of an asbestos abatement?
Short answer: yes. We've saved schools hundreds of thousands of dollars in asbestos abatement costs.
Asbestos was commonly used in the construction of schools between the 1950s and 1980s due to its durability, heat resistance, and insulating properties. It was often used in building materials such as insulation, flooring, ceiling tiles, and roofing.
Asbestos is dangerous because when its fibers are disturbed, they can become airborne and inhaled, leading to serious health problems such as lung cancer, mesothelioma, and asbestosis. The risks of asbestos exposure were not widely recognized until the 1970s, and many schools built before that time may still contain asbestos-containing materials that need to be properly managed or removed to prevent exposure to students and staff.
Resurfacing the chalkboards that have asbestos behind them is a great way to keep the fibers contained and upgrade to new premium whiteboards in your school. Resurfacing with Think Board saves you time, money, and a whole lot of hassle.
Can you go over whiteboard paint/whiteboard wallpaper?
Yes we can! We have covered an entire school the previously painted their chalkboards with whiteboard paint. You can read about that here.
Below is a video of us installing Think Board over a 26 foot Walltalkers Whiteboard that was no longer erasing well.
And here are some before and after photos of resurfacing Whiteboard Paint.
Don't let your classrooms look like this
Can you do custom size & templates?
Yes and yes. Just let us know the sizes you need and we'll send you a quote. We price per square foot, so if you have funky 15 foot boards, we can work with you!
We can also print anything you want, whether it's a logo, grid, or music staff. Just let us know what you're looking for and we can get you a quote. Typically we charge a $50-100 custom fee per board that is custom printed.
Is this easy enough for my team to handle?
About 50% of our customers decide to self-Install the product. We have a quick installation video on our site here, and also have a longer, more detailed version that we can email over to your crew! If anyone on your team has installed wallpaper, wall graphics, window tinting film, or any other large material with a squeegee, then they can probably handle this! Just be sure to have a crew of 2-3 people, watch our install videos, and add more water than you'd think is needed to ensure no bubbles!
Is your team able to install the product?
We have install crews in pretty much every major city in the United States & Canada. As long as you are within a few hour's drive from a big city, we'll be there!
If you're ready to purchase, just request a Formal Estimate with Installation included. Either through this form or via email - purchasing@think-board.com
Outside of this region? Let us know and we'll happily look into expanding into your region so we can work with you and the schools, offices, and hospitals in your area.
Is the product removable after a period of time?
Yes, the adhesive with stay exactly where you want it for as long as you need, AND remove cleanly with no adhesive left behind.
People ask this question for 3 reasons:
Reason 1: Adjusting during install
You'll be able to position and reposition the Think Board over and over again during the install. Just be sure to have enough water on the original board to allow the board to come on and off easily. If you install the entire board incorrectly, you will still be able to remove the Think Board and try again.
Reason 2: "What happens after 15 years?"
Great question. Our adhesive is designed to remove cleanly from your surface. You should be able to remove the Think Board off of your chalkboard/whiteboard and apply a new one without needing to spend hours scraping off adhesive residue. Alternatively, you could simply add another layer of Think Board on top of the old one and extend the boards life another 15+ years! Imagine that... taking a board that was ready for the landfill and giving it another 15, 30 or 45 years of life that easily! Other compeyitive products we've seen end up bubbling up over time, peeling at the corners, and leaving lots of adhesive residue behind. This is one of the things that makes Think Board so unique :)
Reason 3: "What if someone peels it off the board as vandalism"
Since the Think Boards get trimmed on-site, they are nearly perfect from edge to edge. Most people don't even notice that there is something to peel. And even if they really wanted to, they would have to peel pretty hard. Out of all the boards we've resurfaced, we've never seen this happen.
Is the process like applying a screen protector or window tinting?
Sort of! Much much larger of an application, but yes, a similar idea. We think installing a Think Board is easier to get a bubble-free install vs. a screen protector. Our founder, Hanson, has installed 5000+ Think Boards but he's still nervous when installing his screen protector 😂
Is this a cleaning product? Or a material that goes over the existing boards?
This is a whiteboard film that covers your old board. It is not a cleaning solution/spray.
Here's what most of our schools do:
If you are looking for a whiteboard solution, you came to the right place. Whether you're resurfacing 50-year-old chalkboards or whiteboards that aren't erasing, Think Board is the best option for quality, longevity, and ease of install.
Most whiteboards & chalkboards are about 1-2 inches shy of the stock sizes. Meaning, a whiteboard that measures 46"x94" can be resurfaced with a 48"x96" (4'x8') Think Board. We include an extra couple inches for wiggle room!
We include basic installation tools in every order, but if you are ordering more than 5 boards, consider checking out our Premium Resurfacing Kit.
Best for:
Covering Any Table
Most kidney tables we see are about 4'x6'. If you need custom printing, check out our custom page here!
ps. you can also trim the board with scissors or a utility knife if you need to cut them in half or trim them to size!
3. Check out our Classroom Set.
Best for:
Student-Centered Learning
Engaging All Types Of Students
Great for differentiating instructions for kids. Think Board creates a very experiential and kinesthetic learning process for the kids. It is much better for muscle memory, and the kids have so much fun using it! Some of our teachers structure their classrooms in a Socratic circle so they can go around and give students instantaneous feedback if they’re doing something wrong.
Need A Formal Estimate?
How To Resurface A Whiteboard
Whiteboard Resurfacing - How To Resurface A Whiteboard
The secret to restore a whiteboard is the prep work. Check out our recommended tool list before installing. All orders come with a basic set of tools to install (cleaning cloth, retractable knife, squeegee). We also have the option to purchase the Premium Resurfacing Kit if you'd like.
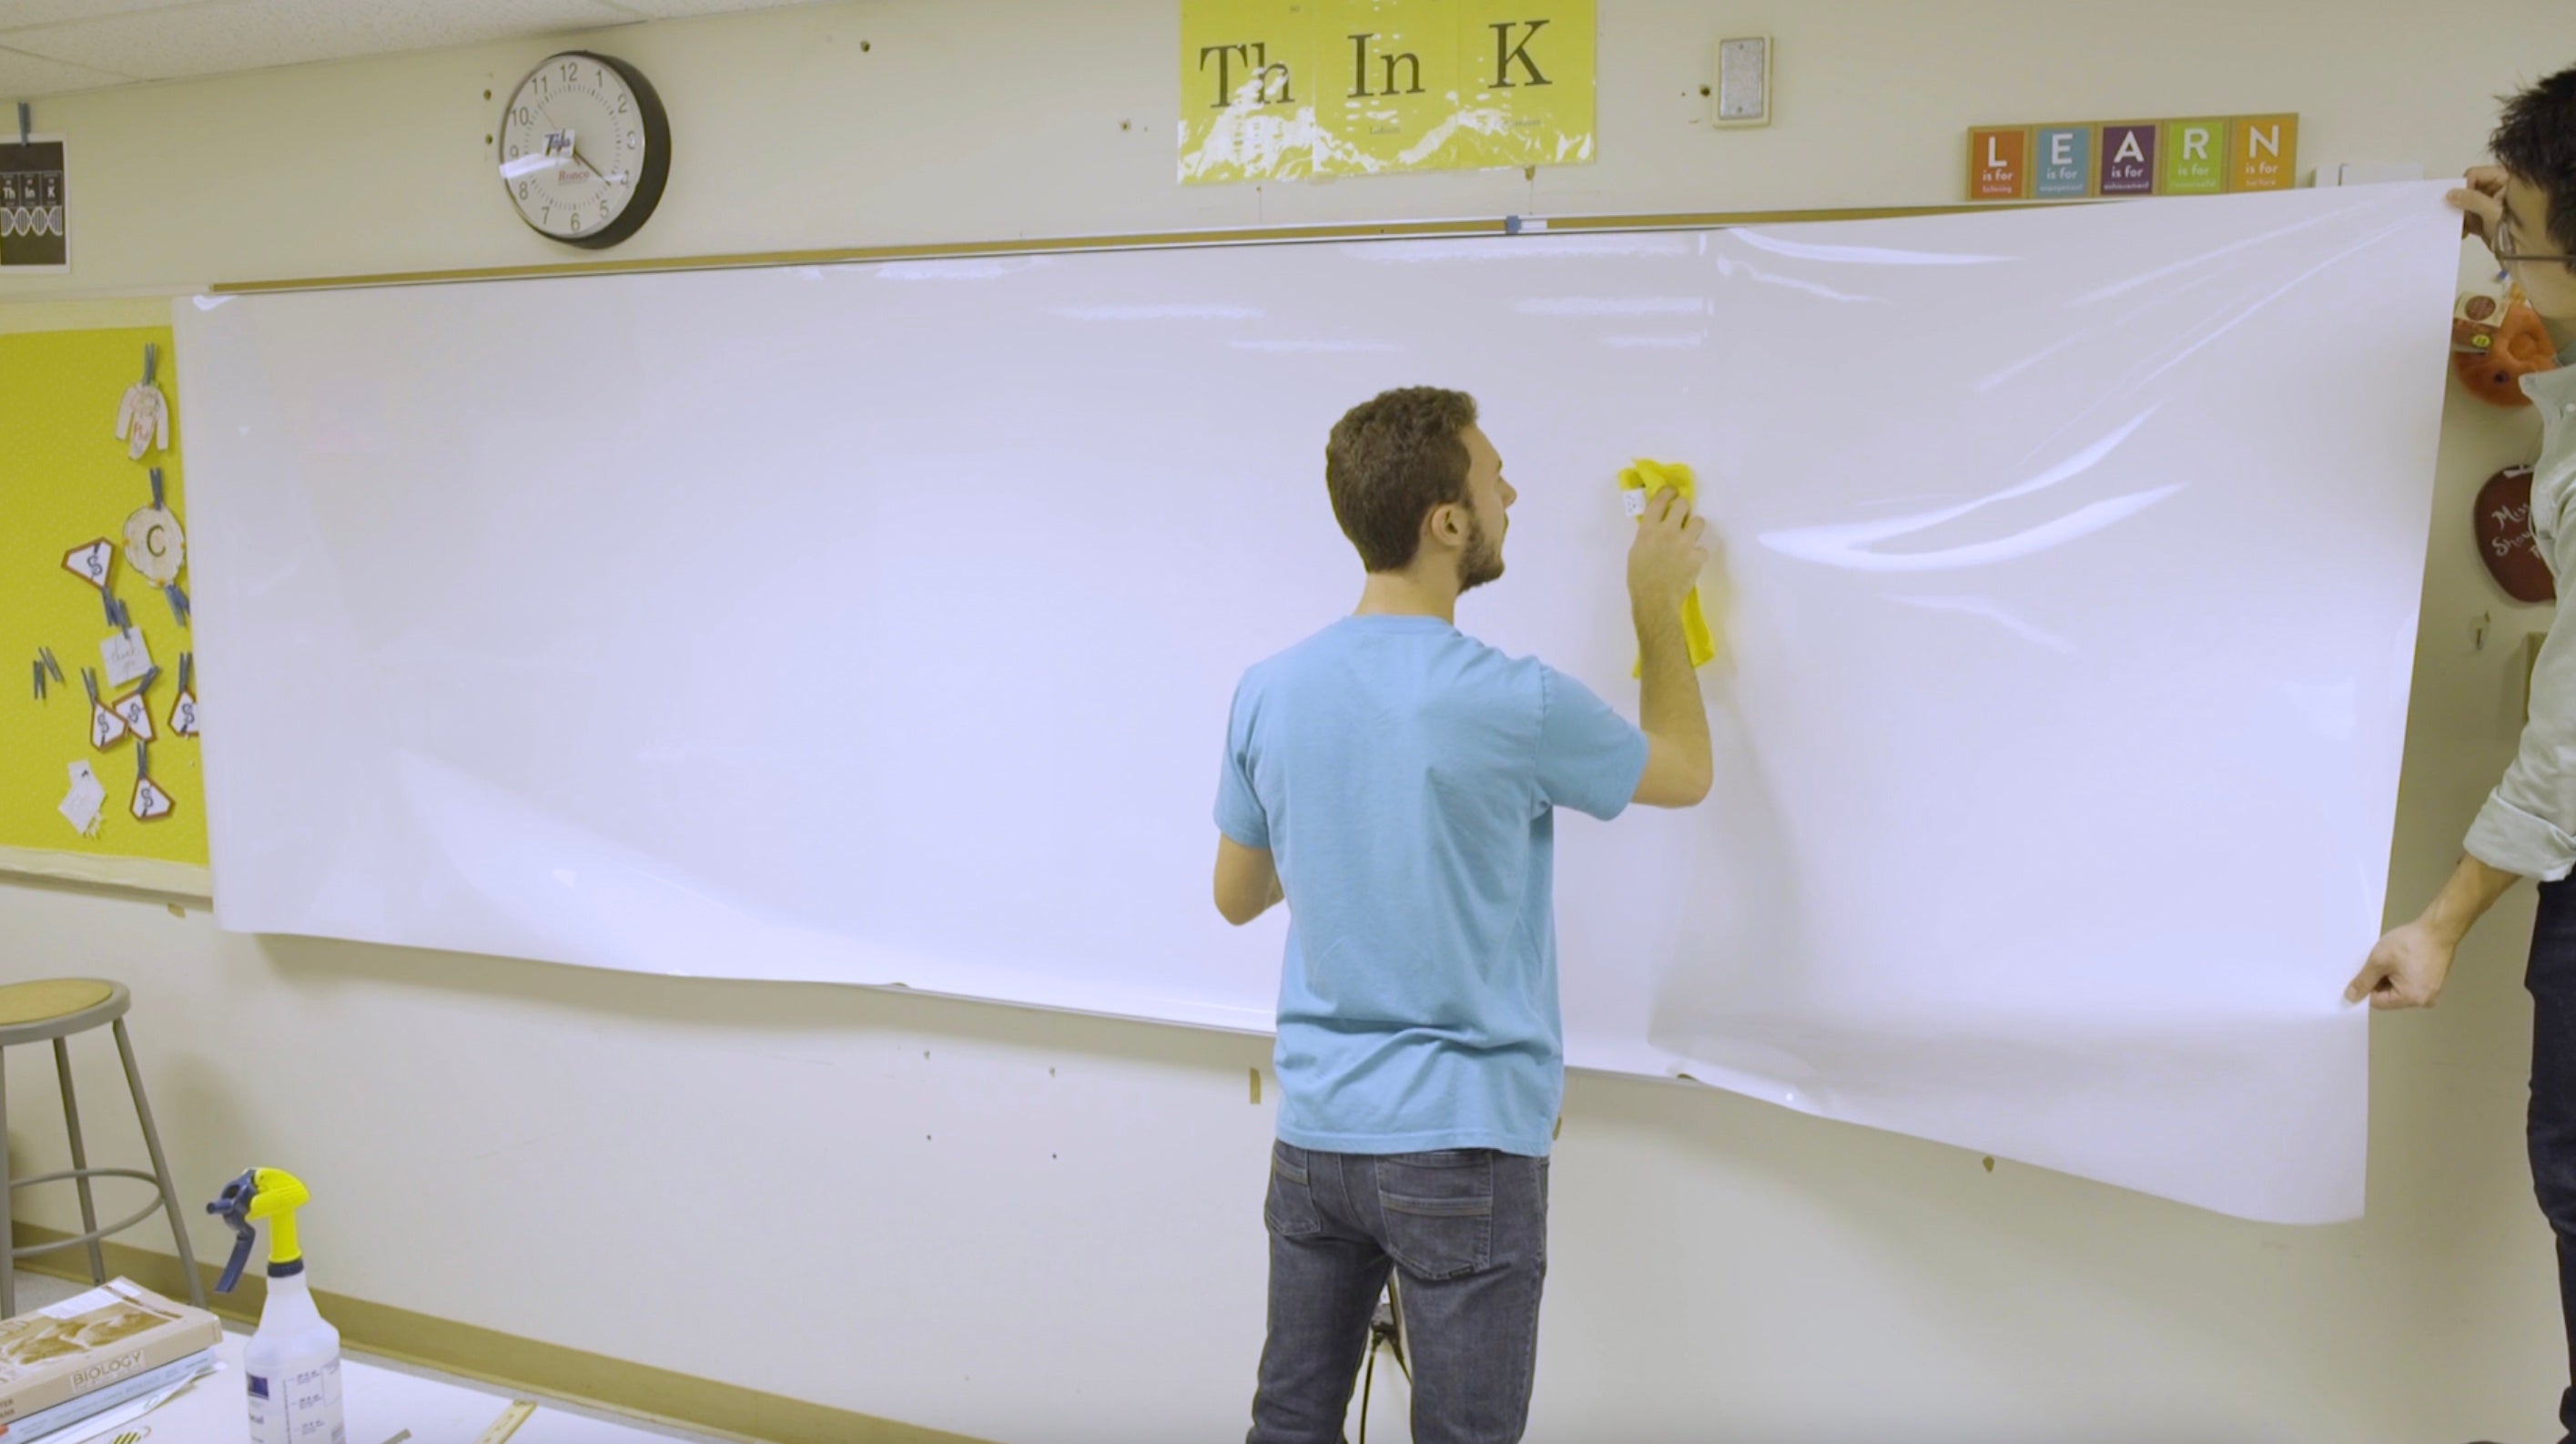
1. Clean The Board
Wipe down the board with a microfiber cloth and water. The goal is not to get the original board clean & white. The goal is to remove any dust, debris, or leftover adhesive on the board. We normally include a little scraper to help remove all of this! The cleaner the board, the better the Think Board will look :)
Sometimes old whiteboards have raised bumps or holes in them. If needed, take a sander to smooth the surface down a bit. Nothing crazy, but just enough to even out that spot (we use 240-600 grit sand paper). If you have the opposite problem, consider filling the hole with Spackling paste and then sanding once dry.
Use a moist rag to wipe around the frame of the whiteboard as well as the marker tray to get rid of any stray dust. Why? Generally, we make the Think Boards a little larger than the boards being resurfaced. This gives you room to hold onto the edge of the Think Board and manipulate it more easily, but it also means more adhesive that can pick up dust or move dust. Dust will cause tiny debris bumps under the Think Board.

2. Remove Old Tape/Adhesive
Scrape the original board with a razor to get rid of any tape, paint droplets, glue, or whatever crusty weird stuff is on the board from the last 10-100 years of use.
If you’re resurfacing several boards, it's worth it to invest in a heavy-duty paint scraper.
3. Wipe Down With Rubbing Alcohol
If you’ve got crazy duct tape or something ridiculous that won’t clean off, use rubbing alcohol and a microfiber cloth.
Once the board is good to go, we recommend doing one final wipe-down in 1 direction. This helps to push dust in one direction and off your board instead of spreading it around in circles.

4. Mist Old Board With Water & Baby Shampoo
Mix 5-10 drop of Baby Shampoo with water. Spray your old whiteboard down with plenty of solution before you stick the Think Board onto the original surface. Why? When the board is wet, the Think Board’s adhesive won’t stick as hard and you’ll be pushing water bubbles instead of air bubbles. Water bubbles don’t compress, air bubbles do. It will save you time in the long run because you’ll be doing much less fixing. More water always makes the install easier!!

5. Expose 8-12 Inches Of Adhesive And Unroll Onto Whiteboard
Most of the time, we do not have enough table space to lay the Think Board flat and remove the entire backing. So instead, we expose just enough adhesive to create a hinge on one side. With the edge secured in place, you and a 2nd person can then unroll the Think Board while removing the backing from the Think Board. The goal of this is to simply get the Think Board close to the right position. (This is why cleaning the edges, trays, and anything else that is dusty is important because this is where the Think Board could accidentally pick up random dust)


6. Reset The Think Board Into Place
Since the board is wet applied, you can easily adjust the Think Board. You will need a 2nd person for this step. If the board is longer than 12 feet, you will want a 3rd person to support the middle. Be sure to hold the edges of the Think Board tightly. We've dropped a board or two here.
Peel the Think Board off the old board and gently float it into place. Don't worry, if you don't like how it set onto the board, you can try again. If you retry more than twice, it helps to have someone mist the board again.
Most of the time, we try to align the top edge of the Think Board just below the metal/wood edge. Why? It saves us an extra cut at the end and we can generally get it within 1/16th of an inch. If you can't get it that close or want to make it a little easier, give yourselves a 1-2 inch overlap on the top. That way, you don't need to worry about alignment. If the board is longer than 12 feet, we recommend overlapping the top edge because the droop in the middle is a little too hard to get perfect. That's where the 3rd person comes in!

7. Squeegee Out The Bubbles, Starting From Center
Once you're happy with how the Think Board is set, we can touch the top 2 corners of the Think Board onto the whiteboard to make sure they stay in place.
To begin, walk to the center of the board and make a vertical stroke. Start from the middle and push up, and then return to the middle and push down. This creates a center hinge and will allow you to reset the tension on both the left and the right sides.
While standing at the center line with your hands on the Think Board (so it doesn't fall off), have your partner peel back the left side of the Think Board until the center line. This resets the tension. They can either hold it here for you as you begin squeegeeing, or float it back onto the whiteboard.
Start squeegeeing in that direction. Make sure that every stroke overlaps the previous one. Normally we do a 12-inch horizontal stroke from the center, pushing left, and then overlapping horizontal strokes up to the top, and then overlapping strokes to the bottom. And then we begin the next 12" chunk. Overlapping strokes will help you prevent leaving behind small gaps which will become bubbles. Once the left side is complete, go back to the center, have your partner reset the right, and repeat.
Bubbles happen when there is extra tension somewhere where there should not be. Resetting often helps relieve the tension. If you would like to be extra cautious, squeegee about 1-2 feet, pin the board in place, and have your partner reset. And keep repeating this until the edge.
Whenever you adjust the position of the Think Board, check to make sure there is enough water so that you have the flexibility to continue adjusting.

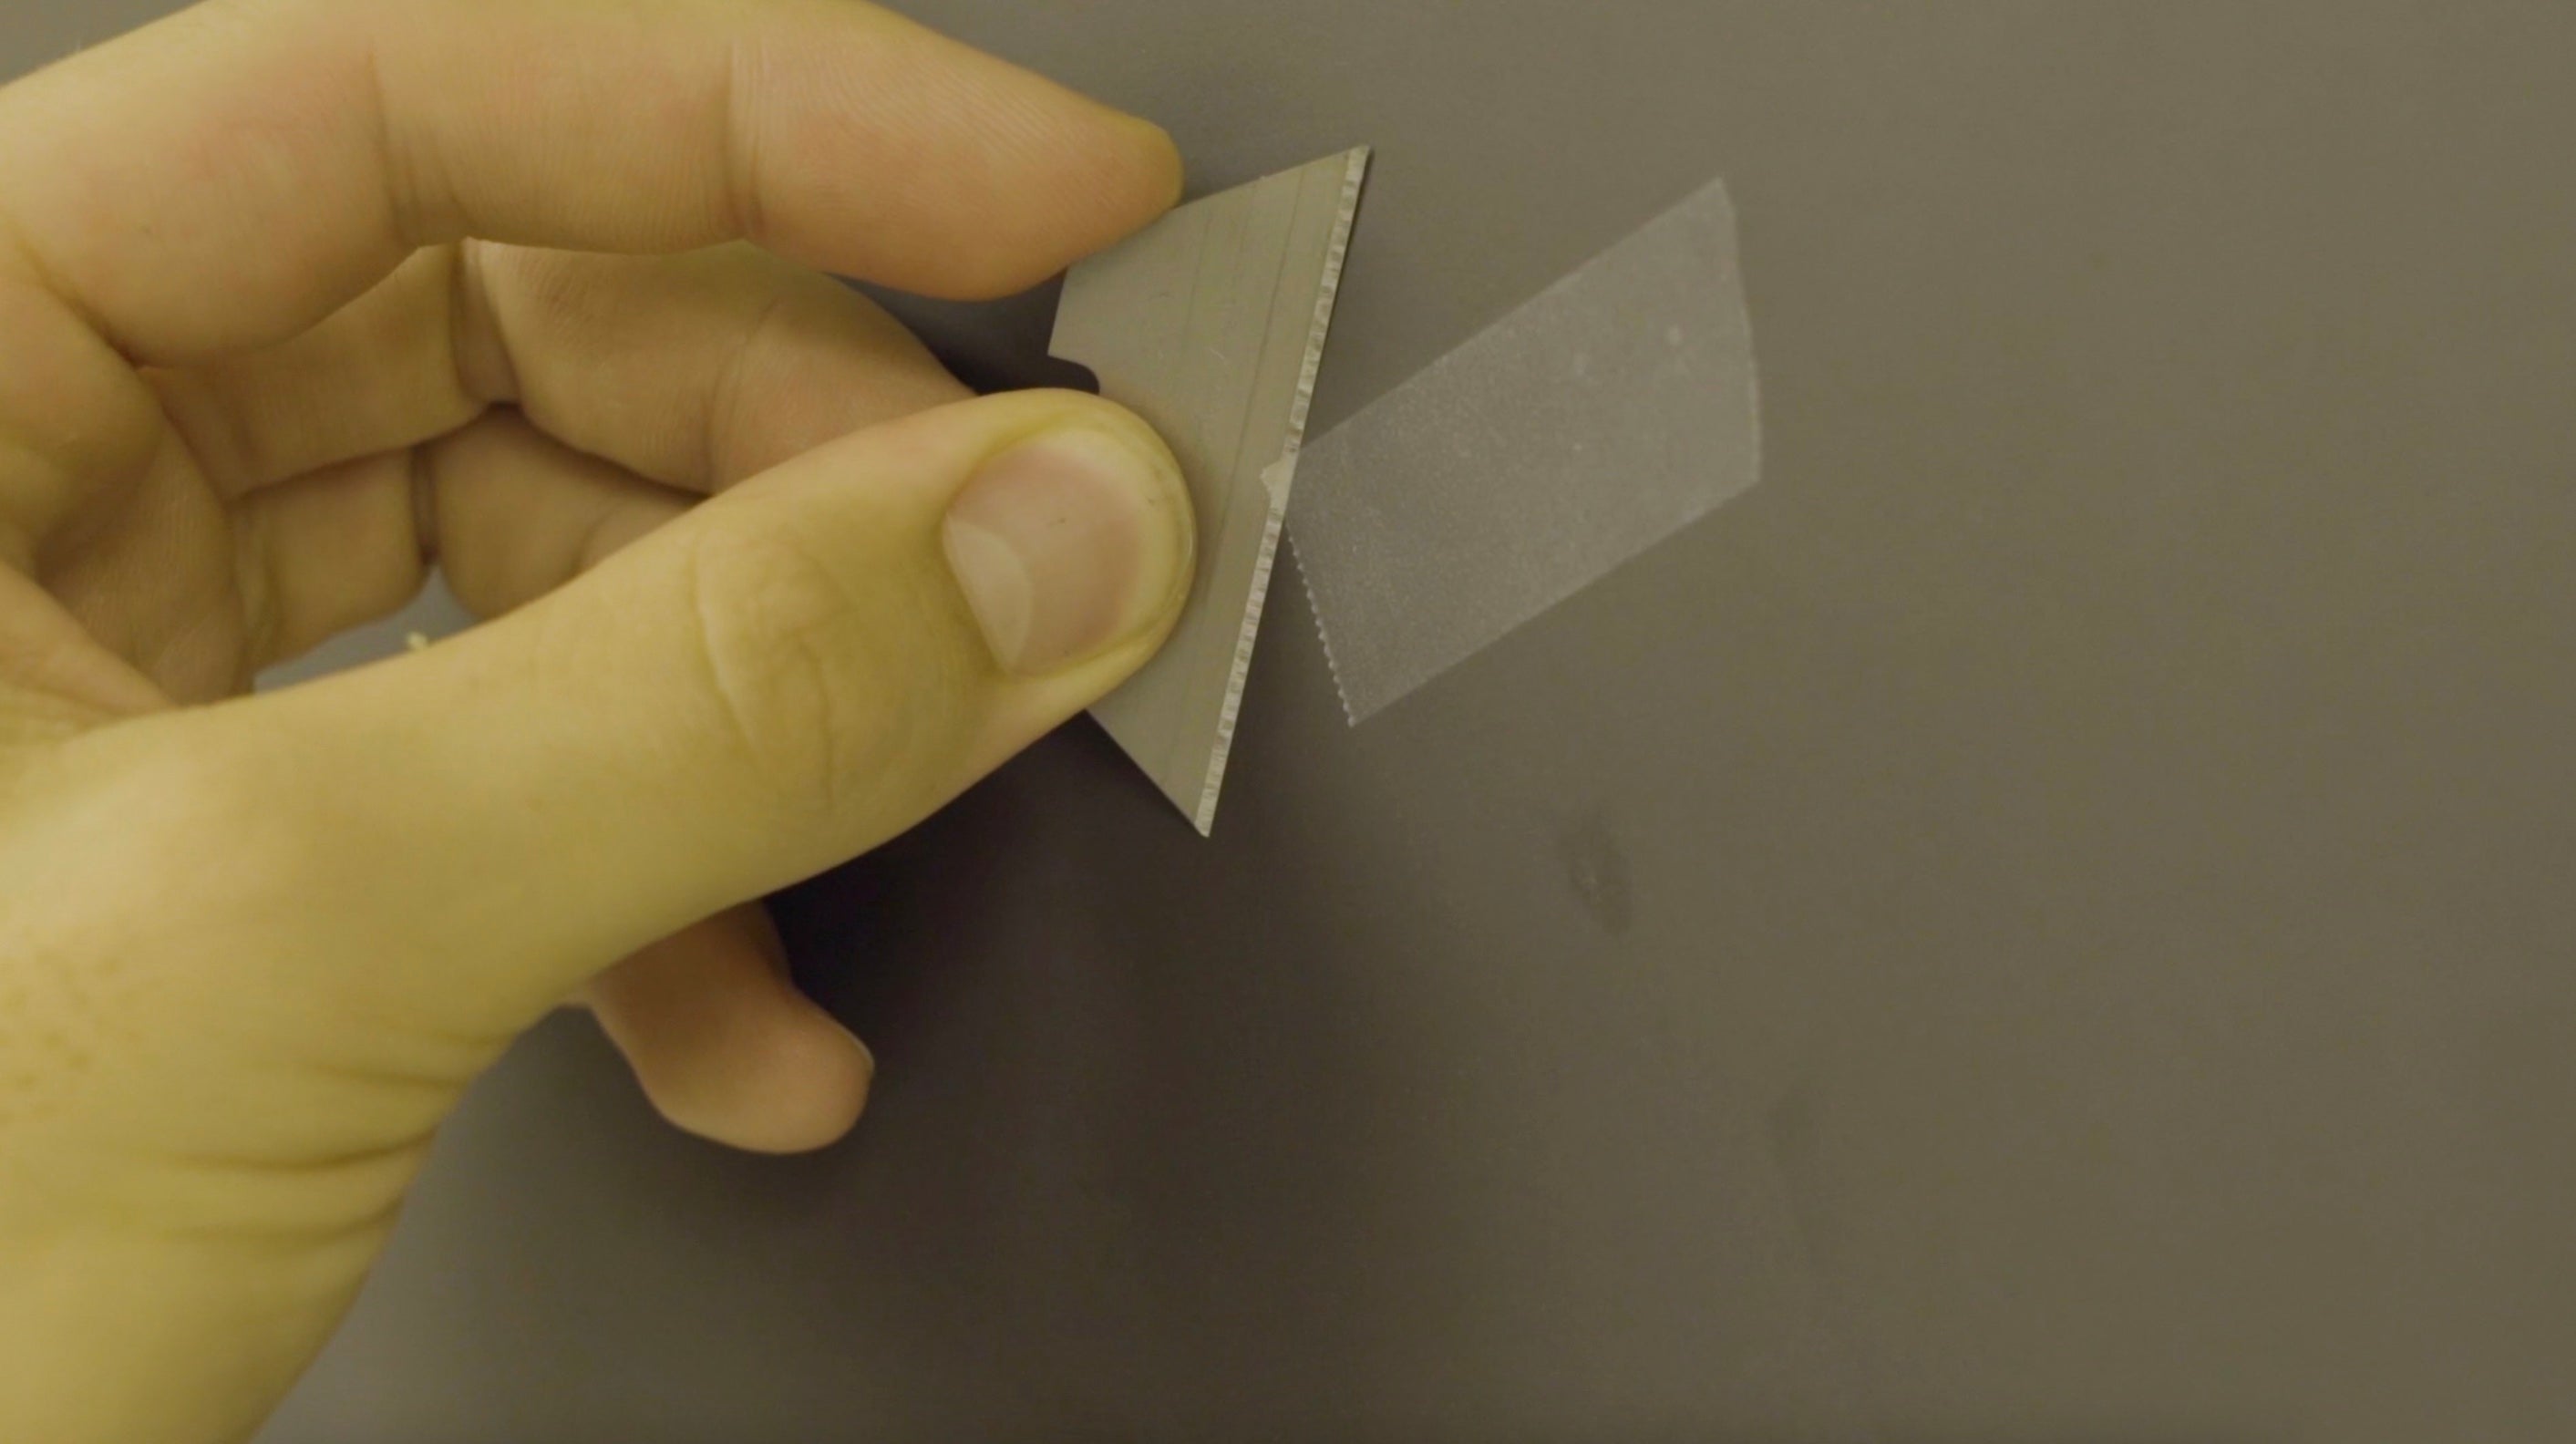
8. Trim The Edges
For cutting the edges, take your squeegee in one hand and your retractable knife in the other hand and run both together around the edge of your original board.
Why? When running the squeegee and the knife together, you have a guide on both sides of the blade, this prevents your hand from slipping. The squeegee also makes sure that the edges are pressed down the best that they can be throughout your cut.
When wet applying, a wet board might not lay perfectly flat when you are using cutting into it and pulling at it with the razor. The squeegee will help make sure that everything lays flat as you are cutting.
Replace your knife blades often. A new one for every 2 or 3 boards isn’t a bad idea.

9. Add Think Board Sticker & Cloth
We include a Think Board "Best Cleaning Practices" sticker with every board, as well as a Think Board microfiber cloth. We normally place the sticker in the bottom left or bottom right corner of the board. The cloth can be washed easily in the laundry whenever it gets too dirty.
10. Tell Your Friends :)
Think Board has grown almost entirely on Word Of Mouth. We feel it's much more impactful for someone like you to recommend Think Board to another teacher, school, or district. So if you're excited about this super-high-quality-amazing-new-whiteboard that you now have in your classroom/school, consider sharing the love and telling others!
Bonus:
We can Facetime/Video Call in and talk you through it if you are having trouble. We are here to help and if your install really doesn’t go well, we can send you another. :)
Just shoot us an email, hello@think-board.com
Or a call/text - (617) 657-9616
Think Board Resurfacing - How To Resurface A Chalkboard
The secret to a beautiful install is the prep work. Check out our recommended tool list before installing. All orders come with a basic set of tools to install (cleaning cloth, retractable knife, squeegee). We also have the option to purchase the Premium Resurfacing Kit if you'd like.
1. Clean The Board
Wipe down the board with a microfiber cloth and water. The goal is not to get the original board clean & white. The goal is to remove any dust, debris, or leftover adhesive on the board. The cleaner the board, the better the Think Board will look. :)
Use a moist rag to wipe around the frame of the chalkboard as well as the marker tray to get rid of any stray dust. Why? Generally, we make the Think Boards a little larger than the boards being resurfaced. This gives you room to hold onto the edge of the Think Board and manipulate it more easily, but it also means more adhesive that can pick up dust or move dust. Dust will cause tiny debris bumps under the Think Board.
2. Remove Old Tape/Adhesive
Scrape the original board with a razor to get rid of any tape, paint droplets, glue, or whatever crusty weird stuff is on the board from the last 10-100 years of use.
If you’re resurfacing several boards, it's worth it to invest in a heavy-duty paint scraper.
3. Wipe Down With Rubbing Alcohol
If you’ve got crazy duct tape or something ridiculous that won’t clean off, use rubbing alcohol and a microfiber cloth.
Once the board is good to go, we recommend doing one final wipe-down in 1 direction. This helps to push dust in one direction and off your board instead of spreading it around in circles.
4. Mist Old Board With Water & Baby Shampoo
Mix 5-10 drop of Baby Shampoo with water. Spray your old chalkboard down with plenty of solution before you stick the Think Board onto the original surface. Why? When the board is wet, the Think Board’s adhesive won’t stick as hard and you’ll be pushing water bubbles instead of air bubbles. Water bubbles don’t compress, air bubbles do. It will save you time in the long run because you’ll be doing much less fixing. More water always makes the install easier!!
5. Expose 8-12 Inches Of Adhesive And Unroll Onto Chalkboard
Most of the time, we do not have enough table space to lay the Think Board flat and remove the entire backing. So instead, we expose just enough adhesive to create a hinge on one side. With the edge secured in place, you and a 2nd person can then unroll the Think Board while removing the backing from the Think Board. The goal of this is to simply get the Think Board close to the right position. (This is why cleaning the edges, trays, and anything else that is dusty is important because this is where the Think Board could accidentally pick up random dust)
6. Reset The Think Board Into Place
Since the board is wet applied, you can easily adjust the Think Board. You will need a 2nd person for this step. If the board is longer than 12 feet, you will want a 3rd person to support the middle. Be sure to hold the edges of the Think Board tightly. We've dropped a board or two here.
Peel the Think Board off the old board and gently float it into place. Don't worry, if you don't like how it set onto the board, you can try again. If you retry more than twice, it helps to have someone mist the board again.
Most of the time, we try to align the top edge of the Think Board just below the metal/wood edge. Why? It saves us an extra cut at the end and we can generally get it within 1/16th of an inch. If you can't get it that close or want to make it a little easier, give yourselves a 1-2 inch overlap on the top. That way, you don't need to worry about alignment. If the board is longer than 12 feet, we recommend overlapping the top edge because the droop in the middle is a little too hard to get perfect. That's where the 3rd person comes in!
7. Squeegee Out The Bubbles, Starting From Center
Once you're happy with how the Think Board is set, we can touch the top 2 corners of the Think Board onto the chalkboard to make sure they stay in place.
To begin, walk to the center of the board and make a vertical stroke. Start from the middle and push up, and then return to the middle and push down. This creates a center hinge and will allow you to reset the tension on both the left and the right sides.
While standing at the center line with your hands on the Think Board (so it doesn't fall off), have your partner peel back the left side of the Think Board until the center line. This resets the tension. They can either hold it here for you as you begin squeegeeing, or float it back onto the chalkboard.
Start squeegeeing in that direction. Make sure that every stroke overlaps the previous one. Normally we do a 12-inch horizontal stroke from the center, pushing left, and then overlapping horizontal strokes up to the top, and then overlapping strokes to the bottom. And then we begin the next 12" chunk. Overlapping strokes will help you prevent leaving behind small gaps which will become bubbles. Once the left side is complete, go back to the center, have your partner reset the right, and repeat.
Bubbles happen when there is extra tension somewhere where there should not be. Resetting often helps relieve the tension. If you would like to be extra cautious, squeegee about 1-2 feet, pin the board in place, and have your partner reset. And keep repeating this until the edge.
Whenever you adjust the position of the Think Board, check to make sure there is enough water so that you have the flexibility to continue adjusting.
8. Trim The Edges
For cutting the edges, take your squeegee in one hand and your retractable knife in the other hand and run both together around the edge of your original board.
Why? When running the squeegee and the knife together, you have a guide on both sides of the blade, this prevents your hand from slipping. The squeegee also makes sure that the edges are pressed down the best that they can be throughout your cut.
When wet applying, a wet board might not lay perfectly flat when you are using cutting into it and pulling at it with the razor. The squeegee will help make sure that everything lays flat as you are cutting.
Replace your knife blades often. A new one for every 2 or 3 boards isn’t a bad idea.
9. Add Think Board Sticker & Cloth
We include a Think Board "Best Cleaning Practices" sticker with every board, as well as a Think Board microfiber cloth. We normally place the sticker in the bottom left or bottom right corner of the board. The cloth can be washed easily in the laundry whenever it gets too dirty.
10. Tell Your Friends :)
Think Board has grown almost entirely on Word Of Mouth. We feel it's much more impactful for someone like you to recommend Think Board to another teacher, school, or district. So if you're excited about this super-high-quality-amazing-new-whiteboard that you now have in your classroom/school, consider sharing the love and telling others!
Bonus:
We can Facetime/Video Call in and talk you through it if you are having trouble. We are here to help and if your install really doesn’t go well, we can send you another. :)
Just shoot us an email, hello@think-board.com
Or a call/text - (617) 657-9616